下面我们来利用Spring4来编写一个RESTFul Web Service的Hello World!
你将得到:
一个能够在 http://localhost:8080/greeting 这个URL上接收get请求并相应一个JSON格式结果{“id”:1,”content”:”Hello World!”} 的RESTFul Web Service服务。
你还能够通过在URL后面跟参数来改变相应的结果,如:
http://localhost:8080/greeting?name=Stalvan 则得到相应:
{“id”:1,”content”:”Hello Stalvan!”}
必需准备:
1.大概15分钟时间。
2.JDK1.8或更高版本
3.Gradle2.3+或Maven3.0+(本文示例采用gradle构建)
开始构建:
1.在STS中右键创建一个spring Starter Project。
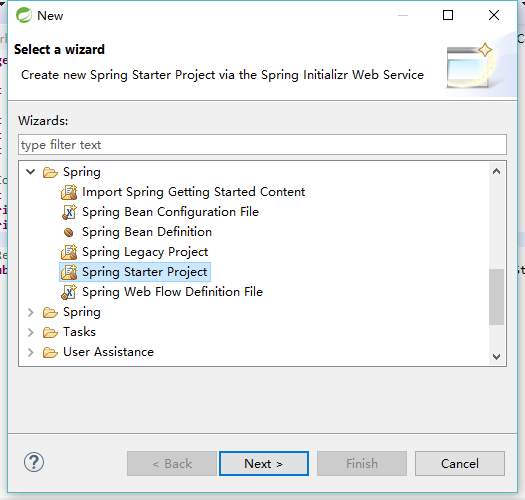
点击Next 按照图中所选填充值
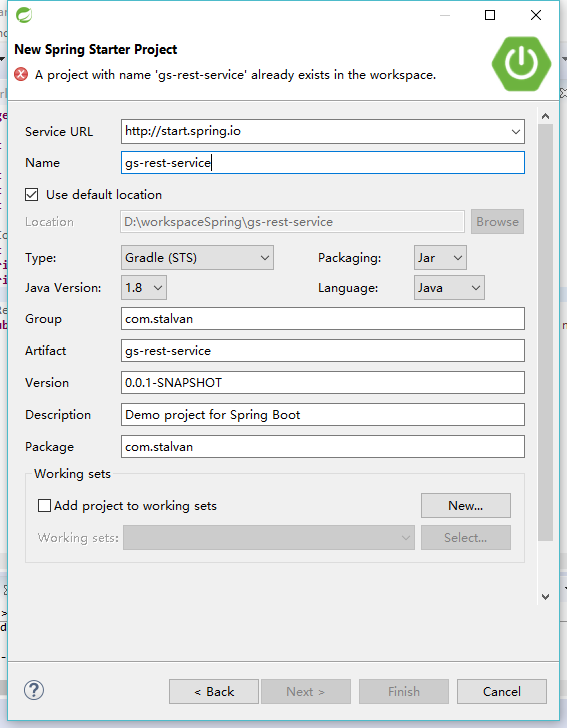
点击Finish
2.在包com.stalvan中创建类Greeting 代码如下
package com.stalvan;

public class Greeting {
	private final long id;
    private final String content;

    public Greeting(long id, String content) {
        this.id = id;
        this.content = content;
    }

    public long getId() {
        return id;
    }

    public String getContent() {
        return content;
    }
}
这个类是响应的内容的javabean。Spring4集成了JacksonJSON,所以我们写代码时直接响应这个对象就可以,Spring会替我们进行对象到JSON串的转换,不用手动进行JSON的转换。
3.在包com.stalvan中创建处理器类 GsRestServiceApplication类 代码如下:
package com.stalvan;

import java.util.concurrent.atomic.AtomicLong;

import org.springframework.web.bind.annotation.RequestMapping;
import org.springframework.web.bind.annotation.RequestParam;
import org.springframework.web.bind.annotation.RestController;

@RestController
public class GreetingController {
	private static final String template = "Hello, %s!";
    private final AtomicLong counter = new AtomicLong();

    @RequestMapping("/greeting")
    public Greeting greeting(@RequestParam(value="name", defaultValue="World") String name) {
        return new Greeting(counter.incrementAndGet(),
                            String.format(template, name));
    }
}
这个类是我们真正处理请求的处理器类,下面我们解释一下用到的注解。
@RestController 表示我们的这个类是作为RESTFul Web Service的Resource Controller使用的。这个注解是在Spring4中新增的,相当于以前版本的@Controller和@ResponseBody的结合使用。有这个注解,我们可以在方法中直接返回对象。而不是返回一个view。
@RequestMapping(“/greeting”) 这个注解指定了当请求/greeting 的URL的时候,请求会被注解交给下面的方法进行处理。这个注解是不区分get post put 方法的。如果需要进行指定可以写成 @RequestMapping(method=GET,”/greeting”)。
@RequestParam 绑定了请求URL中的参数name的值到方法参数的name对象中去。如果没有指定,则值为指定的defaultValue。
build.gradle 文件的内容修改如下:
buildscript {
	ext {
		springBootVersion = '1.5.2.RELEASE'
	}
	repositories {
		mavenCentral()
	}
	dependencies {
		classpath("org.springframework.boot:spring-boot-gradle-plugin:${springBootVersion}")
	}
}

apply plugin: 'java'
apply plugin: 'eclipse'
apply plugin: 'org.springframework.boot'

version = '0.0.1-SNAPSHOT'
sourceCompatibility = 1.8

repositories {
	mavenCentral()
}

jar {
    baseName = 'gs-rest-service'
    version =  '0.1.0'
}

dependencies {
	compile('org.springframework.boot:spring-boot-starter-web')
	testCompile('org.springframework.boot:spring-boot-starter-test')
}
4.运行程序
我们可以以传统模式把这个工程打包为war,部署到web容器中。本例中我们使用SpringBoot来运行这个程序。SpringBoot通过创建工程时生成的GsRestServiceApplication类作为入口进行启动。下面我们讲解一下这个类。代码如下:
package com.stalvan;

import org.springframework.boot.SpringApplication;
import org.springframework.boot.autoconfigure.SpringBootApplication;

@SpringBootApplication
public class GsRestServiceApplication {

	public static void main(String[] args) {
		SpringApplication.run(GsRestServiceApplication.class, args);
	}
}
代码看起来很简单,我们来讲解一下。
@SpringBootApplication 是一个很方便的注解,它添加了如下的所有注解:
- @Configuration 将这个类在 应用程序上下文中加入到了bean定义之中。
- @EnableAutoConfiguration 告诉SpringBoot 基于classPath 设置,其他的bean和配置 加入了springBoot容器中
- @ComponetScan 告诉Spring在本包(com.stalvan)中寻找组件、配置、和服务 并让其能找到其他的Controller.
- main方法中调用了SpringApplication.run()方法来启动应用。SpringBoot不使用XML进行MVC控制,也不含有web.xml。
- 启动程序。点击windows→showView→other 选择 Gradle(STS)中的Gradle Tasks
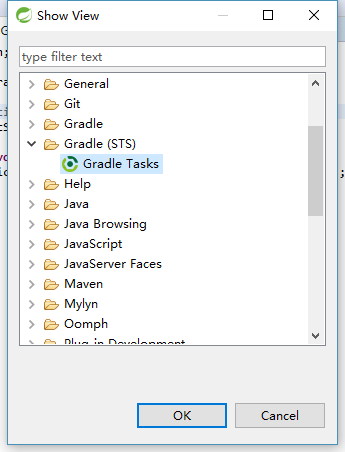
在
中双击bootRun 即可运行程序。
访问 http://localhost:8080/greeting 会得到响应,如果访问http://localhost:8080/greeting?name=abc 则会得到对abc的响应。
5.脱离IDE启动程序。
我们可以把程序打包成一个可执行的jar文件。打开命令行 切换到工程根目录下 执行命令 gradlew bootRun 就可以启动程序。
我们也可以先打包 再执行。打包命令为 gradlew build 然后执行命令为 java -jar build/libs/gs-rest-service-0.1.0.jar
至此 搭建完毕。如需下载DEMO程序 链接如下: