有时候我们想实现在页面端对用户进行弹窗提示的效果。如果您是在liferay官网上下载的运行时环境 那么会自带”通知 portlet” 也就是 notifications portlet.
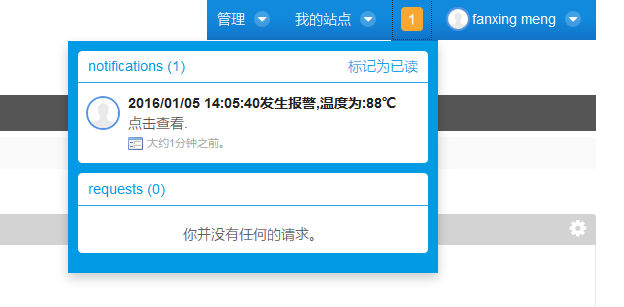
这个portlet显示在右上角的dockbar中。
我们可以通过这个按钮来实现我们的通知的推送。
如果您没有notifications portlet 可以去liferay 的marketplace去下载和部署。
liferay自定义通知需要一个BaseUserNotificationHandler的子类来实现组装通知栏处的HTML代码块。
我们需要在liferay-portlet.xml中加入用户通知定义的XML文件与自己编写的BaseUserNotificationHandler的子类。
liferay-portlet.xml代码如下
<portlet>
		<portlet-name>curPic</portlet-name>
		<icon>/icon.png</icon>
		<user-notification-definitions>warn-notification-definitions.xml</user-notification-definitions>
    	<user-notification-handler-class>com.longshine.notifications.WarnNotificationHandler</user-notification-handler-class>
		<header-portlet-css>/css/main.css</header-portlet-css>
		<footer-portlet-javascript>
			/js/main.js
		</footer-portlet-javascript>
		<css-class-wrapper>curpic-portlet</css-class-wrapper>
	</portlet>
接下来我们编写warn-notification-definitions.xml 这个配置文件。代码如下:
<?xml version="1.0" encoding="UTF-8"?>
<!DOCTYPE user-notification-definitions PUBLIC "-//Liferay//DTD User Notification Definitions 6.2.0//EN" "http://www.liferay.com/dtd/liferay-user-notification-definitions_6_2_0.dtd">
<user-notification-definitions>
	<definition>
		<notification-type>${com.longshine.notifications.WarnNotificationHandler.PORTLET_ID}</notification-type>
		<description>receive-a-notification-when-example-triggered</description>
		<delivery-type>
			<name>website</name>
			<type>${com.liferay.portal.model.UserNotificationDeliveryConstants.TYPE_WEBSITE}</type>
			<default>true</default>
			<modifiable>true</modifiable>
		</delivery-type>
	</definition>
</user-notification-definitions>
如果你是用maven构建的项目 那么这个文件应该放在src/main/resources 目录中。 如果你是用ant构建的项目 那么这个文件应该放在docroot/WEB-INF/src 目录中。
其中的portletId的真正的值是在我们的com.longshine.notifications.WarnNotificationHandler 这个类中定义的。这个类中的代码如下
package com.longshine.notifications;

import com.liferay.portal.kernel.json.JSONFactoryUtil;
import com.liferay.portal.kernel.json.JSONObject;
import com.liferay.portal.kernel.notifications.BaseUserNotificationHandler;
import com.liferay.portal.kernel.util.StringBundler;
import com.liferay.portal.model.UserNotificationEvent;
import com.liferay.portal.service.ServiceContext;

public class WarnNotificationHandler extends BaseUserNotificationHandler{
public static final String PORTLET_ID = "curPic_WAR_shanhuoportlet";

	public WarnNotificationHandler() {

		setPortletId(com.longshine.notifications.WarnNotificationHandler.PORTLET_ID);

	}

	@Override
	protected String getBody(UserNotificationEvent userNotificationEvent,
			ServiceContext serviceContext) throws Exception {

		JSONObject jsonObject = JSONFactoryUtil
				.createJSONObject(userNotificationEvent.getPayload());
		String picTime = jsonObject
				.getString("picTime");
		String temperature = jsonObject.getString("temperature");
		String title = "<strong>"
				+ picTime + "发生报警,温度为:" + temperature + "℃"
				+ "</strong>";
		String bodyText = "点击查看.";
		StringBundler sb = new StringBundler(5);
		sb.append("


<div class=\"title\">");
		sb.append(title);
		sb.append("</div>


<div "); sb.append("class=\"body\">");
		sb.append(bodyText);
		sb.append("</div>


");

		return sb.toString();
	}

	@Override
	protected String getLink(UserNotificationEvent userNotificationEvent,
			ServiceContext serviceContext) throws Exception {

		JSONObject jsonObject = JSONFactoryUtil
				.createJSONObject(userNotificationEvent.getPayload());
		return jsonObject.getString("viewURL");
	}

	protected String getBodyTemplate() throws Exception {
		StringBundler sb = new StringBundler(5);
		sb.append("


<div class=\"title\">[$TITLE$]</div>


<div "); sb.append("class=\"body\">[$BODY_TEXT$]</div>


");
		return sb.toString();
	}
}
其中的getLink方法实现的是设置点击某条通知时跳转的URL
其余的两个方法就是在组装对应的XML了。
那么我们如何来调用并发送一个通知呢?
代码如下:
JSONObject payloadJSON = JSONFactoryUtil
											.createJSONObject();
									payloadJSON.put("userId", user.getUserId());
									payloadJSON
											.put("viewURL",
													url
															+ "&_curPic_WAR_shanhuoportlet_queryPicId="
															+ pic.getShanHuoPicId());
									payloadJSON.put("temperature",
											pic.getTemperature());
									payloadJSON.put("picTime",
											sdf.format(pic.getPicTime()));
									UserNotificationEventLocalServiceUtil
											.addUserNotificationEvent(
													user.getUserId(),
													com.longshine.notifications.WarnNotificationHandler.PORTLET_ID,
													(new Date()).getTime(),
													user.getUserId(),
													payloadJSON.toString(), false,
													serviceContext);
里面的payload这个json里面的键值对 可以按需设置。在我们的handler类里面去取就是了。至于serviceContext一般情况下可以通过
ServiceContext serviceContext = ServiceContextFactory.getInstance(portletRequest);
来获取。
这样 我们就实现了自定义的通知。对应的通知效果如图:
参考的外文站链接:自定义通知英文站 Thanks for Reigo Reinmets‘s blog.